Adding OpenCV 3.4.3 to your Visual Studio 2017 C++ Project
This is a step by step guide that shows the process to add OpenCV to your Visual Studio Project.
Getting Things Ready, Download Stuff
This guide is written for people on Windows 10 but I guess not much changes for other windows versions. I am using Visual Studio 2017 Community and OpenCV 3.4.3 but the process should work with the slightly older versions of both as well.
- I assume you have Visual Studio with C++ features installed. If you do not, download it here.
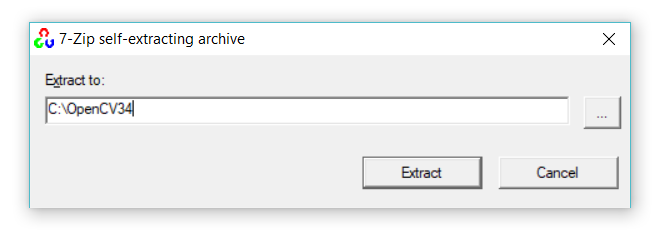
- You can download OpenCV from OpenCV Releases page, go for latest 3.4.x. After downloading this, run the installer, set the path at C:\OpenCV34 and press Extract. That’s all.
Make a C++ Console Project in Visual Studio
- Open Visual Studio 2017
- Click Create New Project.
- Choose Visual C++ > Windows Console Application
- Pick a suitable name and change the location if you want to.
- Press OK
This is a gif, click for full-res
Add OpenCV to your C++ Console Project
- Select x64 as Solutions Platform.
- In Solutions Explorer, select your Project > Right Click > Properties
- Choose C/C++ > General, you should see Additional Include Directories somewhere. Good, add the path to OpenCV Include folder there. Mine was this,
C:\OpenCV34\opencv\build\include
- Choose Linker > General, you should see Additional Library Directories on the screen. Add the path to OpenCV libraries over there, Mine is this,
C:\OpenCV34\opencv\build\x64\vc15\lib
- Choose Linker > Input, select Additional Dependencies. Click on the down arrow on the far right, click on Edit and paste the .lib filename here,
opencv_world343d.lib
- Click OK. You’re done!
Click on this gif for full-res version, link as video
Troubleshooting
This might be obvious but I will write anyway. If you run into a problem, read the error. It’s likely because you did either of the above steps wrong. Things to check usually,
- Do you have x64 selected as Solutions Platform?
- Check if the paths you have pasted are correct and if the folders exist.
- If you have downloaded a different version of OpenCV, you will have slightly changed paths and library filename. Make suitable changes.
- If you can’t find a window, reset your window-layout in Visual Studio. Choose Window > Reset Window Layout.
Improvise, Overcome, Adapt!

Leave a comment